Author Archives: Sp3000

[Week 1] Pointer locks and browser 3D

Cuuuuubes

Cuuuuubes

This week marks the start of a semester long project I’ll be doing as part of a university course. The plan is to *whispers incomprehensibly* requiring WebGL and *whispers incomprehensibly* will probably be familiar to those who play Minecraft.

For now I have a WebGL page up here – initially i was going to make everything using WebGL directly, but after confusing myself with buffers and shaders I resorted to using the three.js library instead. It’s making my life a lot easier.

Here is a summary of my triumphs and failures in this past week:

  • Getting the Pointer Lock API to work in Chrome: Pointer locking is where your cursor is disabled. It allows you to do things like spin around and around without having to worry about your cursor hitting the edge of your window. It took me a while until I realised that Chrome only allows pointer locking after some sort of user input (e.g. mouse click).
  • Researching DartAs good as Dart seems to be as a Javascript alternative, I got utterly confused when trying to work out how to use Javascript libraries from Dart. So I gave up and reverted back to JS.
  • Getting something to actually work: This. So far it only works in Google Chrome though – and the only other browser I’m planning to support is Firefox. That’s because these two browsers are the only ones which support the Pointer Lock API so far. Firefox has this annoying thing where the pointer locking only kicks in for full screen mode though…

So huzzah. I’m off to (some sort of) start.

Graph drawing in LaTeX

Graphs? No, not pie graphs. Not even graphs of functions. THESE graphs.

Yesterday I tried making LaTeX notes for one of my maths courses. Not so much because I needed digital notes (to be honest it would have been much faster on paper), but because I wanted to get some practice at typing up documents in LaTeX.

I aimed to finish the discrete maths half of the course in a day, just to see how quickly I could make the document. After all, LaTeX has a steep learning curve, and some people, like me initially, probably have the impression that LaTeX would be slower than other what-you-see-is-what-you-get word processing software. Well, I met my aim.

However, to be fair, discrete maths only involved a lot of equations, which are easy to type up once you’re used to it. Graph theory, the other half of the course however, would definitely take longer due to the diagrams that had to be drawn. Well I thought it would take a very long time, but that’s because I only started looking into how to draw LaTeX graphs today.

It’s a shame that I only know a few words of French. At least the code’s in English though

I found out, after some research, that there is a tkz-graph package for LaTeX. It makes graph drawing pretty easy. Installing it took some figuring out, but it turned out that MikTeX has an installer for packages inbuilt, which was very useful.

The good thing about tkz-graph is that you can define vertices, and then reference them when creating edges. I haven’t worked out most of the features yet, but I can make some simple graphs now at least.

Simple graphs.

Here’s the code I used to generate the first of the graphs (the other two are similar):

\begin{minipage}[b]{0.3333\linewidth}
\centering
    \begin{tikzpicture}[scale=.5]
        SetGraphUnit{2}
        \GraphInit[vstyle=Classic]
        \tikzset{VertexStyle/.style= {fill=black, inner sep=2pt, shape=circle}}

        \begin{scope}[rotate=135]
        \Vertices[Lpos=135, unit=2, NoLabel]{circle}{A, B, C, D}
        \end{scope}

        \Edges(A, B, C, D)
    \end{tikzpicture}
\end{minipage}

For those interested, here’s a few quick notes about what I know, and don’t know about the above code:

  • The \begin{minipage} is what allows me to show three graphs side by side. Make sure your minipage blocks of code don’t have any empty lines in between them though, or your diagrams will appear under each other as opposed to adjacent (empty lines are like telling LaTeX “I want a new paragraph!”)
  • I’ve got SetGraphUnit{2} there, which refers to how far about everything is. However, I’ve also got unit=2 when defining the vertices – I put that there because for some reason some graphs were turning out smaller than others if I didn’t have it…
  • In the \tikzset command, inner sep=2pt makes the vertices smaller than their usual size.
  • The Lpos=135 argument of the \Vertices command refers to the positioning of the vertex labels in relation to the vertices (135 degrees rotation). I’ve also set labels off with NoLabel though, so it’s not actually doing anything.
  • \Edges draws edges continuously, so \Edges{A, B, C, D} draws the edges AB, BC and CD.  For a single edge, use \Edge(A)(B).

I’m only just starting out though, so this will get interesting when I have to draw more complex graphs. As a forward reference though, here’s some things I’ll be expecting to use:

  • There is a label option for the edges, which will come in handy for weighted graphs.
  • tikz supports a \foreach command, which is like a programming for loop for repetitive tasks. This will probably come in useful for drawing complete graphs.

Too lazy to click links

Quite a lot of files to download and not enough patience in me

Quite a lot of files to download and not enough patience in me

It’s the end of the university semester, and that means downloading-every-available-resource time. For archiving reasons.

Unfortunately, there are a lot of files to be downloaded. For instance, one subject might have  12 weeks of content, each week having a tutorial sheet, a tutorial solution, a practice class sheet and a practice class solution. That’s 48 links already, and that doesn’t even include past exams and other resources yet!

So I started to think, maybe I could use Python and Requests to nab the files I need. First I’d specify a URL, an output folder and the types of files to be downloaded (pdf, tex, etc). Then all I would have to do is run the program and voila! Everything downloaded in a second!

Well, that only worked for my first subject.

Unfortunately, other subjects needed a bit more work to get the files – you had to first log in with your university account. I saw this coming, so I was surprised that my first attempt even worked (maybe the lecturer just couldn’t be bothered).

I didn’t end up figuring my way around this. Requests has a way of submitting forms by using requests.post(url, data), but unfortunately my university used some sort of authentication I couldn’t work out. Other subjects I didn’t even attempt, since they were on a completely different system which also required logging into.

One thing I did learn from this, however, is that you can download files with Requests quite easily. Fetch the file with r = requests.get(url), and the binary data can be found in r.content. Then all you have to do is write to a file using open(filename, “wb”).

What this means is that when I wrote my xkcd comic downloader, I didn’t actually have to use the Python Imaging Library. I could have just written to a file directly using the “wb” mode – and in fact this would also resolve my problem of downloaded GIFs being static

An overview of past projects

High school quality graphics.

Over time you learn new things, and find new ways to apply what you know. Or maybe there’s something you don’t yet know but want to learn, so you decide to look it up and play around with it.

That, in a nutshell, is how my post-primary school life went. I’d (infrequently) embark on new experiments, generally digital ones, and make something small over the course of a few days. Rarely did I ever create a large project which gave off a sense of completion, but nonetheless even the small projects were nice learning experiences.

Here I thought I’d share… quite a lot of these projects. Maybe you’ll find my journey amusing, and consider this a nice read. Or maybe I can somehow motivate you to try things you’ve never done before. Either way, enjoy.

(This is quite a long post, so feel free to skim the page and read the parts that look interesting. My heartfelt thanks goes to you if you end up reading it all though.)

Continue reading

The Puyo Puyo Puro-gram

Why anybody would put a match-n game like this under the “Puzzle” category confuses me

About a month or so ago, Sega came out with “Puyo Puyo Quest”, a smartphone “Puzzle RPG” from the Puyo Puyo franchise. It has become my latest public transport timekiller.

On the bottom half of the screen, you clear away up to 5 puyos with a swipe (linked horizontally, vertically or diagonally). Gravity influences the remaining puyos, and any blocks of four or more puyos of the same colour (linked horizontally, vertically but not diagonally) are removed, and add to your characters’ attack. Gravity continues to take effect and more puyos fall to fill in the gaps. Repeat.

After playing this for a while, I’ve gotten to the stage where the bosses of each quest have an abnormally high HP (I wonder whether they’re just trying to make you fail in order to pay for “magic stones” that let you continue). Since it’s getting hard to pass normally, I thought I’d try to write a program for this problem.

Some input and output corresponding to the screenshot above

Some input and output corresponding to the screenshot above

Basically the program reads in the grid from a text file. It then goes through all possibilities of removing puyos, and simulates the outcome. The program reports back the move which gives the highest “score”, as well as the move with the largest combo.

You may notice that the input file on the left has a few extra lines before the grid. This is because clearing a certain colour only adds attack to characters of that colour. Since I had no purple or blue characters, linking four or more blue/purple puyos together would do nothing. The extra lines of input are meant to represent the attacking power of my party corresponding to each colour, and the “score” of each move is then calculated based on this, along with other factors such as how many puyos of each colour were removed.

There were also a few game-related quirks to be taken into consideration. The heart piece, for example, disappears when an adjacent group of puyos disappear (the heart heals characters). In addition, the row of small coloured circles above the board indicate the next colour to fall in that column. These weren’t particularly hard to deal with, but it did take some thinking.

Currently my program is not very efficient – you’re allowed to remove up to 5 puyos at once, but my program is only fast enough to calculate removing 3 in a reasonable time. On the bright side, that’s good enough for most practical purposes. Although, despite saying that, having to type out the game board into the text file each time is pretty painful.

Song database, part 1

It works!

It’s been two months already – surely I haven’t been so busy that I’ve been too preoccupied to do any new projects?

Well actually, I have. I think I’ve been having too much fun with these Rhythm Heaven videos. Although, despite saying that, I’ve got about one or two more in progress as of writing.

But anyway, here’s a different project which I just hacked up today. Since I’m doing databases at uni this semester, I decided to make a song database. It’s meant to store all the key signatures, BPMs and time signatures that I would need to know about a song in order to include it in a medley. Currently that info is contained inside an Excel spreadsheet, which is a little inconvenient in terms of searching and sorting.

Setting up the database (I’m on Hostgator) wasn’t too hard, but I had to use the interface of phpMyAdmin since I didn’t know the syntax for MySQL. I’m sure it’s similar to PostgreSQL though, PostgreSQL being the system used by my university. Admittedly I jumped a few steps when setting up – I was too lazy to design the database properly.

After creating the database I tried connecting to it via PHP, and made it generate a table displaying all the songs I had so far in the database. It took a few tries, but the screenshot at the top shows how it turned out. Pretty good. I had to add a few extra things to make the Japanese song names show instead of the previous question marks though – something about UTF-8 character encoding.

Currently, I only have a single table of songs which you can see, although there’s more tables in the database internally. I’m planning on making the songs/artists/origins hyperlinks, so that when you click on them you can get more information. And then I’m adding a search bar so that you can search for songs based on name/artist/origin. If I’m feeling ambitious, I might even make it so that I have my own interface for adding/modifying/deleting songs (phpMyAdmin isn’t great). And if I’m feeling ultra ambitious I might add a feature for creating custom song lists, to help with medley making.

Well, that’s the plan. I don’t know how long that will take though.

The particle simulator

Pretty colours!

Pretty colours!

One day a friend of mine made a sort of battle royale – you had things bouncing around and when two collided they would “battle” each other. One person, determined partly by the amount of EXP they had, would turn out victorious and continue bouncing around merrily until only one remained. The “game” was somewhat fun to watch – and the fact that the names of people he knew were included made it really interesting. After all, who wouldn’t want to see their own character win?

So I asked him what he used to make all this stuff and I learnt from him that he uses Pygame for his graphical Pythoning purposes. And today I decided to try it out myself.

This cheat sheet from the internet sure came in handy – it allowed me to do what I wanted without having to go through pages of documentation. So Pygame was easy to set up. I was off to a great start.

What did I wish to make? Something equally fun and mesmerising to gaze at, of course. I decided on a sort of particle simulator, where circles would whiz around, affected by only gravity (implemented straight from the formula). It worked beautifully for the first few seconds. But then two particles collided with each other, and flew off at a funny angle. It turns out that, if the distance between two objects is small, the force due to gravity becomes extremely large. And since my particles were allowed to overlap one another, they could theoretically even have a distance of zero!

So that got fixed with an absorbing mechanism, just like the Katamari games. So now, just like the battle royale, one giant blob would remain victorious at the end, having swallowed up all the others. But of course, that would be pretty sad and boring to watch so I let you add more particles by clicking anywhere in the window.

Naaa~ na na na na-na na na na katamari damacy!

Naaa~ na na na na-na na na na katamari damacy!

The particles would sometimes go offscreen too, so I put in an auto-zooming camera option. That tended to make the particles really small (to compensate for the zooming) though.

So how long did that all take? 3 hours! Woo!

How to make a Rhythm Heaven MAD

KON-KON...KON-KAN...KON-KON-KAN KEN-KIN-KUN. Or "donk donk" to you if you've played the English version.

KON-KON…KON-KAN…KON-KON-KAN KEN-KIN-KUN. Or “donk donk” to you if you’ve played the English version.

Rhythm Heaven – making the weirdest minigames musically addictive. Rhythm Heaven MADs – making your favourite songs musically addictive. What could possibly go wrong.

About a month ago the Wii version of Rhythm Heaven came in my mail (I was a fan of the DS version and had been hoping to get my hands on the Wii version for a while now). Soon after that I decided to make a MAD for “crossing field”, the opening theme of Sword Art Online. I’d seen a few Rhythm Heaven MADs on Nico (like these two excellent ones), and wanted to try making my own. Unfortunately, the crossing field project only went halfway – the chorus had too many offbeats and I was at a loss about which minigames to utilise.

I once contemplated making one for “Evans” from Jubeat, thinking “Rhythm Evans” would make a great video title. Dotted quaver beats killed that plan though.

So then I went onto an easier song, and that became Guilty Crown’s OP, “The Everlasting Guilty Crown”. I think the project went pretty well overall, although there are a few parts which could have been better.

So now to document my procedure so that my future self can make another one of these again.

Sound effects

Adding sound effects to the song involved a lot of fiddling around...

Adding sound effects to the song involved a lot of fiddling around…

So the first of two steps was to add sound effects to the music using Audacity, and in order to do that I had to figure out how fast the song was. Everlasting had a BPM of 172.

Once I got that down, I made a click track (the track with grey lines above) in Audacity so that I could visually see where the beats were. This made it easier to know where to add the sound effects.

Next, get the sound effects! Luckily, a kind user on Nico had already ripped out the sound effects from the remixes via audio editing (if you have the song with and without SFX, you could do that yourself with Audacity and the Invert effect, then Mix and Render). So sound effects were obtained by ripping audio off these videos using Nicosound.

Then I worked out the BPM of the remixes so I could adjust the sound effects to the speed of Everlasting using Change Tempo. For reference, Remix 10 (which is a useful resource) is BPM 166.

Now that all the tools were ready, I just added the sound effects to the song however I wanted, being mindful of how the song progresses in order to make things sound good. It was interesting, trying to analyse parts of the song in order to decide which minigame to use where.

One note though – if you’re using the rocket minigame, the Change Pitch effect is useful for making the pitch of the rocket sounds follow the song.

Video

This was a nice exercise in learning how to use Premier and After Effects

This was a nice exercise in learning how to use Premiere and After Effects

Once you’ve got the sound effects mixed into the song, everything should sound pretty good already. But being able to see what happens makes it even more catchy!

First, obtain the video resources. Grab Rhythm Heaven perfect runs from somewhere – I just took some off Niconico.

Then just add the videos in! I make it sound easy, don’t I? But for the most part, it is. You’ll have to change some video speeds by working out the BPM of the video clip’s original songs though. Also, add some dip-to-black transitions between each clip to make the transitions smoother, and everything should be pretty much fine.

There’s a few times where things might get tricky though. One situation is if you can’t find any video clip which has the exact same beats you have, and another is if the video fits your beat, but the video itself isn’t very good (or your video cutting is obvious because, for example, a butterfly just teleported). You might have to change your beats in those situations to make things simpler, or use After Effects to alter the videos. Also, if you’re having trouble making your video be on the beat, you can add the click track into the project as audio and use it as a visual reference again.

And that’s about all there is to it. It isn’t very hard – all you need to do is add sound effects and video and if you can get your hands on both then the rest is mostly straightforward. It might take a bit of messing about, but isn’t exactly a difficult project. For the record, Everlasting took about 3 or 4 days.

Robotics notes for Lego NXT 2.0

A few days ago, fun came in the mail. And by fun, I mean Lego Mindstorms NXT 2.0.

Basic driving robot made by following the instruction manual

Mindstorms NXT 2.0 is a robotics set by Lego, featuring a programmable “brick” which cables with and controls sensors and motors. And in true Lego fashion, you can connect pieces together and customise parts to create what you want.

I first encountered the kit in Legoland (on a trip to the US), and have searched for it ever since. Unfortunately, it was expensive, so it was only a week ago when I decided to finally buy this extremely extravagant toy. Completely worth it.

The programming for the robot is done via a drag-and-drop interface on the computer, and is very beginner-friendly.

Pretty colours!

Pretty colours!

NXT 2.0 comes with instructions for building and programming 4 models, the first of which is a driving robot that shoots coloured balls. The balls are shot at a very fast speed, so looking for and picking up the balls afterwards quickly became a hassle.

The second and third models are a robotic alligator and a ball sorting machine respectively. Not really interested in them yet, though.

The fourth model, however, is a humanoid robot dubbed Alpha Rex. It is capable of walking and swinging its arms around, with an ultrasound sensor for eyes (to gauge distance) and a colour sensor on its right arm.

Meet Alpha Rex

Alpha Rex took two nights to construct – there were a lot of instructions to follow. It doesn’t always walk straight and the cables get in the way of its arms moving, but it’s pretty impressive nonetheless. What I find amazing is how the hands open and close as the arms swings – all of this is done by only one servo motor. The legs are also pretty interesting too – there’s a motor for each as well as a touch sensor in order to tell when the leg is on the ground.

But this is the start though. In a week or two I’m planning on dismantling Alpha Rex and making something of my own. And that’s when the fun will really begin (or so I claim).


Solving the 24 game (or, alternatively, Letters and Numbers)

When I was a child, my parents would play the 24 game with me – pick four numbers, usually from 1 to 9, and try to make 24 using the four basic operations (+ – × ÷). For example, given “5 6 7 8”, you could solve it like this:

  • 7 – 5 = 2
  • 6 ÷ 2 = 3
  • 3 × 8 = 24

Each number had to be used exactly once. It was good arithmetic practice, and made for an educational boredom killer on long car rides. Not every combination of four numbers gave a solution, but most of them did – the trick was usually to work your way to one of 2 × 12, 3 × 8 or 4 × 6.

Once I became somewhat proficient at this game, my parents gave me the killer problem – “1 5 5 5”. I never got it. The answer was quite counterintuitive to me at the time – it’s at the bottom of this post if you want to try it yourself.

I’ve made a program to solve this problem before – about 3 years ago in… Adobe Flash. Yes, Flash and its Actionscript. I couldn’t really code properly at the time, so the algorithm was literally if statements brute forcing through every single possibility.

Then again, I had only just started programming then...

What on earth was I thinking

But the day before yesterday I found out that Microsoft’s Dreamspark program offers free software for students. Perfect for me – I instantly downloaded Visual Studio 2012. I guess they’re trying to get more people to use their software so that they can maintain their market share but, hey, free software works for me.

After messing around a bit in Visual Studio (and following this tutorial to the end), I realised that I could actually make applications now, as opposed to personal-use programs which only I really knew how to use properly.

And this is where the 24 game comes in.

v1.0 - A basic 24 game solver

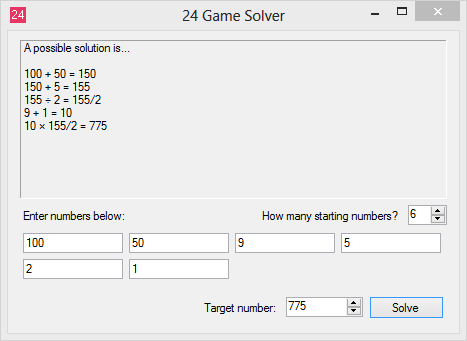
v1.0 – A basic 24 game solver

Above is the first version I made. I’d never done any C# before, but luckily for me its syntax was so close to that of Java (which universities seem to love teaching nowadays), that it didn’t take long for me to pick up. Being able to look stuff up online is an invaluable skill to have.

The algorithm was quite simple – you start out with n numbers. Pick two of them, and an operation to perform on the numbers. Now you have n-1 numbers. Repeat recursively until you have only 1 number left, and check if it’s 24. If not, then backtrack and pick the next operation or, if you’ve run out of those, the next pair of numbers.

Of course, once you’ve got something basic down perfectly (barring OverflowExceptions, but there’s not much I can do about the limits of 32-bit integers), you want to expand things a bit. And that I did.

v1.5 - I'm just making these version numbers up as I go along

v1.5 – I’m just making these version numbers up as I go along

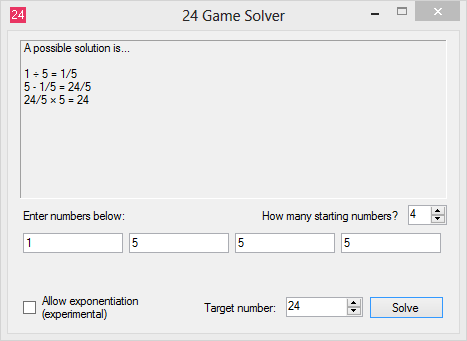
I took a guess that there was some way to hide/show text boxes, and it turns out that there was. So I added a way to have a variable number of inputs (from 3-6 only, due to running time constraints) and a way to change what your target number was. So now you could play Letters and Numbers.Thanks to the fact that I didn’t hardcode the fact that were four inputs previously, the new change wasn’t hard to make.

As shown above though, the program sometimes gives unusual results, such as unnecessarily dipping into negative numbers/fractions and back out again. This is because the program halts immediately upon finding any solution – maybe I could modify that in the future if I’m bothered. The fractions are there because all numbers are stored as fractions consisting of two integers – a numerator and a denominator, to solve the trickier puzzles.

But after an easy modification like that, I wanted a challenge.

Exponentiation could potentially be a major troll

Exponentiation could potentially be a major troll

Another variant is the “Train Carriage Game” – train carriages where I live have a four digit code. Split the code up into its individual digits, and try to make the number 10. Only thing is, this variant sometimes allowed exponentiation.

So I wanted to add exponentiation in there. That would be easy if everything was integers, but what if you had fractional powers? You could potentially take 2 to the one-third, giving cube root 2! Unfortunately, I didn’t want to handle irrational numbers because that could result in inexact answers (due to rounding errors), so I only let the program use exponentiation if the answer would be a rational number. Unfortunate, I know.

Not that fractional powers weren’t painful enough already – it took me about an hour or two to iron out bugs like division by zero problems, overflow exceptions and, sneakiest of all, negative powers which became too small for the computer to handle making it think its new fraction was 0/0.

But all in all, I was glad that it worked out in the end, and I had finally made my first usable and somewhat useful application.

Also as tricky is "3 8 3 8"